Tuesday, December 1, 2015

Addams Family

I'm doing my best to catch up on blogging, but as it usually goes I will probably blog regularly for a week or two and then neglect my blog for months at a time.


Just like my potted plant...well the one that's still alive (hence why I don't have kids, or pets).


This past summer I costumed the Addams Family: The Musical. The story is that Wednesday has grown up and fallen in love with a normal boy. He and his parents are coming over for dinner and she is trying to get her family to act normal - it's actually almost the exact same plot as La Cage Aux Folles except with Goths and ghosts instead of Drag Queens.


In the story Uncle Fester (who in the musical is a lot more of a romantic) enlists the families ancestors to help Wednesday out. So in addition to all the regular characters that you know and love (Gomez, Morticia, Lurch, Pugsley, Grandma) there's a chorus of ghosts each from a different time period. That was the part that I had the most fun with.


Fortunately most the family each had only one main costume. I bought Gomez a striped, double breasted suit. Lurch got an ill-fitting suit. Puglsey had a striped T-shirt. Grandma was just a bunch of raggedy stuff from storage. Morticia's dress was the most challenging. I was trying to follow the costumes from the Broadway version which has her in a tight-fitting (of course), low-cut (well duh), purple and black print (slightly unexpected but it totally worked!)


I couldn't find the exact fabric so I just used a purple and black damask. I was hoping for a stretch fabric to make it easier to fit, but alas no such luck. I ended up adding in panels of stretch fabric on the sides because otherwise she couldn't sit down. The best part about the costume was during the end of the show she and Gomez make up over a tango and she opens up a slit on the dress and makes it into a short skirt for dancing. It was quite the awesome surprise.


Back to the ancestors. I had grand plans that were torn asunder due to lack of men (isn't that just how it always goes in the theater). We were supposed to have an even number of men and women, but it just didn't work out. So we had 4 men and 8 women.


My favorites were the conquistador (which I made from a historical pattern - so not easy) and the saloon girl. I had to sew a lot of the ancestors since they all had to be in white (I also did the makeup design). I could not find an all white flapper dress so I had to buy a basic dress and add fringe.


There's also a random number where Fester sings a love song to the moon (Fester is in love with the moon, go figure) and he serenades her with the help of the female ancestor while they are all wearing vintage bathing suits.


The costumes were fun to make, but overall the show was a lot more work, and the work was a lot more taxing than I had anticipated. So, I'm hoping to take somewhat of a sabbatical from costuming large shows for awhile. Not sure how long it will last since I'm kind of a push over, but I'm definitely not jumping at it yet.


Monday, November 23, 2015

Cupcake Bin

I started this blog because I couldn't find any crafting/sewing/quilting blogs that I could relate to. Too many of them catered to crafters with kids. I don't have any kids and do most of my crafting for theater or just what I need for my childless, adult existence. This post may look like a craft for kids, but it came about in a completely different way.

A couple friends and I have put together a burlesque troupe and were working on putting on our first show (see totally not kid-related). Our event (which happened this past weekend) was to be gluttony or indulgence themed since it was happening in November (Thanksgiving as a theme is not exactly sexy) so our numbers were about food and booze.

I had this fabulous idea to do a super cheeky French number with uber cutesy costumes (think Katy Perry in California Girls) that starts sweet and ends with unexpected twerking (it turned out awesome BTW). To go with the cutesy theme I wanted us to have little cupcake stools to sit on to start the number. The other two girls in the troupe have woodworking significant others so I was hoping one of them could make a simple stool base that I could then upholster like a cupcake, but alas they were both too busy and it was up to me to do some clever crafting.

And was I ever clever! As if you would ever doubt me.


It's made from a kids toy storage bin and I covered it in such a way that it still opens up and can be used as a bin. It's not as easy to carry with the covering, but it's light and easy to move around.

I tried to find a simple stool at Target that I could cover, but what I found was either too large or too expensive. And then I saw these:


They came in two different styles: Frozen and Ninja Turtle. So I bought three, got some cheap vinyl (1 yd for each cupcake), some buttercream colored felt (2 yds of wide felt for 3 cupcakes), and some poly fiberfil seat cushions at Walmart and got to cupcaking.


I'll go through step by step on how I covered the bins, but a couple notes first. I used hot glue which isn't great at sticking to either plastic or vinyl - it will work, for awhile, but it's easy to rip off. The felt on the lids stayed well stuck, but the vinyl around the bottom had some issues. As things came apart I re-glued them with super glue. The super glue worked much better, but due to the size of the project it might be worthwhile to start with hot glue and come back through as needed with the super glue.


So, starting with the lid. I took a seat cushion and cut it into a circle the same size as the lid. Using the cushion corners that I cut off I kind of built up the center since the lid was concave in the middle. Then I covered that with the cushion circle.


Then came the felt, I had to gather it a bit to get it to the right shape, and actually managed to do so without burning myself with the glue gun (don't worry - that part happens later.)


All that was left was to trim the excess felt so that the lid went back on properly.


For the base of the bin/cupcake, I cut my vinyl in half against the grain (not that vinyl really has a grain) and folded the edges on 2 sides to make a clean edge. I pleated the vinyl every 3 inches and just glued it on the top since I would have to adjust for the taper of the bin once I glued it on.


One half of the yard of vinyl made it about 3/4 of the way around so I did have to use some of the second half. Once I made it all the way around the top I went through and glued the bottom pleats in place (this is where I burned myself).


Then I just glued all the pleats over the bottom and covered with a circle cut from the remainder of the second half of the vinyl. And there you have it.

We eventually went through and added some felt sprinkles to the top. 


If I had had more time I might have added a ruffle around the lid or something like that, but oh well. I don't have a picture of all three cupcakes - as you can see from the pictures, one was pink, one was blue, and one was green - but I do have a picture of us in our super cute costumes that go with the cupcakes:


Sunday, November 1, 2015

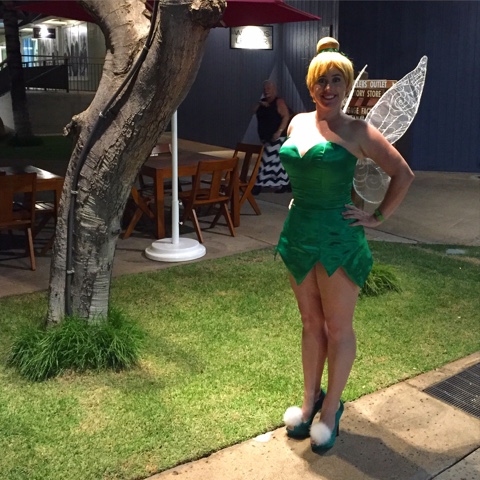
Tinkerbell

After being a zombie for Halloween for many years in a row (6 I think) doing Thriller all over the island, this year I wanted to do something fun and cute and pretty and very much NOT zombie. 

So I chose Tinkerbell:


The costume turned out awesome, though I'd originally had grander plans for it (the wings were going to light up). I ended up not having enough time to do the extras, but I still had a great costume.


The dress was made from a corset pattern (https://www.etsy.com/listing/218051177/overbust-corset-sewing-pattern-lingerie?ref=related-7) I just extended it into a dress. 

All the corset structure is underneath:


I dyed the coutil - it didn't come out as green as I would like, but I swear it looked teal while I was dyeing it. Weird. I used flat steel bones for the center front and center back and plastic whalebones for the rest. I also added a zipper on the side since I wasn't going to have a busk. 

One of the challenges while fitting the mockup (toile) was how to do the back - I didn't want it to lace all the way up from the bottom but I needed someway to cover my bum. I tired just sewing the center back together below the lacing but it did not fit right and kept bunching up in the back. So I ended up making a floating modesty panel that was the same size as the two center back pieces (sorry I didn't take a picture before I laced it up):


The full length modesty panel covered my bum (as a proper modesty panel should) and let the dress keep its shape at the bottom. 

I bought the wig and the shoes on Amazon, and the shoe clip-on poofs on Etsy (annemusingdesigns - I had to request them).
 

The wings were difficult. I've never made wings and they seem like they'd be easier than they were. I'm sure there are some easier techniques, but I had some specific requirements because I had planned on making them light up (maybe someday I'll get around to it). I had planned on using fiber optics to light up the veins of the wings, so I needed to be able to sew the fiber optics on - so I couldn't use cellophane (though there are some amazing cellophane wings out there). Also, with the shape I didn't think that stocking would look right. So here's what I did (sorry, again no pics of the process - I was in a bit of a rush):

1. Frames: I made the wings out of 12 gauge wire from the hardware store. This is a very sturdy gauge, but it can also be a little difficult to work with. Next time I might try 14. I shaped the wings and then taped the wires together with electrical tape - there's probably a better, more elegant way, but this worked. I made a U in the middle so I could use my corset to hold it up:


2. Fabric: I used an iridescenct organza for the fabric of the wings. I like the look of the organza but it would have been nice to have had a stretch fabric. I hot glued the fabric around the edges of the frame - again, I'm guessing there's probably a better, more elegant way to do this, but it worked though I did end up with a couple gnarly burns. 

3. Decoration: I used glitter puff paint for the design. I had it drawn out on a piece of paper and just traced over the wings with pencil and then added the puff paint. My puff paint was old and kept clogging. It ended up being a little messy. Also, I might recommend a chrome silver rather than a glitter silverm but I already had the glitter. 

If I'd had more time I would have covered up the middle section with green fabric or felt so it was a little less visible. But overall, the wings worked out great. They were a little uncomfortable in one spot, but I think if I fiddle with the wire I might be able to fix that. 

Things I've learned and things I might do different:

1. Boning: I might hav shortened the boning a bit at the center front. It was exceptionally hard to sit in and almost impossible to drive in. 

2: Lining and casings: I think it might have looked better if I had done a lining instead of individual casings. Probably would have been easier too. 

3. Fashion fabric pattern: the fashion fabric was a little too long in the waist. The structure fit fine, but I ended up with a roll in the green satin. I need to remove maybe a quarter inch at the waist for the outter fabric only. 

4. Zipper: I put the zipper on the wrong side. Oops. I also upgraded zippers halfway through. I started with a nylon zipper and it wasn't strong enough so I got a metal one instead. 

5. Wings: like i said, there's probably better, more elegant ways to make the wings, but I'm not entirely sure what they might be. If you have any ideas/suggestions/experience please let me know. 


Sunday, May 17, 2015

Egyptians and Romans and Beer

Maui Brewer's Festival is the most wonderful time of the year. It's always right around my birthday and all my friends go and we've taken to dressing up in costume (see Wonder Woman from last year: http://crafty-asschick.blogspot.com/2014/07/wonder-woman.html?m=0).

This year we chose Egyptians and Romans. Here we are:


Tuesday, April 21, 2015

Queen Elsa Costume

Frozen! If you haven't seen it watch it. 

These days everyone loves Elsa and singing about letting it go. Believe me - I certainly do. Recently, I made an Elsa costume for a friend (I'm also working on Anna - have been for a year - but there's just too much detail work it's taking forever).

Here's it is:


I didn't use any of the Elsa sewing patterns available through Simplicity, I kind of combined a couple other patterns to make it.  

I used Butterick 4827 for the skirt and sleeves and New Look 6480 for the bodice:


I picked these mainly because I already had them. To figure out where to cut the dress pattern to insert the corset top I overlayed the pattern pieces over each other matching waistlines and drew in where the skirt seam and neckline + sleeves would start. 

Because I used a stretchy power net for the sleeves I had to do a lot of altering to get them to work since the sleeves and neckline needed to be more form fitting than the pattern allowed for. I don't know what would have worked better but that was definitely not the easiest way to go. 

I ended up buying a lot of fabric online because they kept coming in the wrong color. The bodice is taffeta with rain sequins and coutil underneath for support and boning. The skirt is satin and the train is a glittery organza. Like I said before the sleeves are power net. 

I made the corset first and, other than the pattern issues with the sleeves, it was the most difficult part. Working with sequin fabric takes a lot of time. 

Here's my process: I started with white, silk organza and transferred the seam lines and pattern markings on to it using wax transfer paper. 

I then used those pieces to cut out the sequin fabric:


I then basted the organza and sequin fabric together to both secure the fabrics together and to mark the seam lines:


When sewing with sequin fabric you have to remove all the sequins from the seam allowance and the seam lines to sew them together.  Otherwise the sequins get sewn into the seams and poke out in all kinds of ugly and uncomfortable ways. 

Fortunately the sequins were pretty easy to remove. The were sewn on in small groups so I just removed them by pulling out the bobbin thread. It took some time but it could have been worse. 


It's also important to keep some of the sequins to use later either filling in gaps along the seams or as replacements if some fall off. 

Once all the seam lines were free of sequins I sewed the corset together. Then I sewed the train over that before combining the bodice, sleeves and skirt into the final dress:


Friday, April 17, 2015

100 Days of Doodles

I'm a pretty avid doodler. #workdoodle is one of my regular hashtags on Instagram (@mauisadie in case you want to follow) since I like to doodle in meeting or during phone calls. 

Earlier this month on of my high school friends announced that she was doing the 100 Days Project (http://thegreatdiscontent.com/100days) and suggested that I should as well. 

The 100 Days Project in a nutshell is about creating something for 100 days. The idea is that you pick something to make and make one everyday from April 6th through July 14th.

That's a lot of creating but it's a motivation which I always seem to need.

Since the idea is to create the same type of thing everyday I decided to go with doodling (#100DaysOfDoodles) because I do it quite frequently already, and it's a lot easier than trying to sew something everyday (ain't nobody got time for that).

Since it's only Day 12 here's a few of my favorites so far. 


You can track my progress through the next 88 days on Instagram @mauisadie #100DaysOfDoodles


Wednesday, April 15, 2015

Ass Piñata

As you may recall, a couple years ago I made a Boob Piñata for my sister's bachelorette party. Well a couple of my good friends are getting married next week and they had their bachelor and bachelorette parties last weekend. He's kind of an ass-guy so she asked me to make an ass piñata for his party.

Ideally we were gonna get a fake arm or something to hit it with because that is just hilarious.

Here's the finished product:


That's a real thong.

Unfortunately, since this was my second piñata I thought I was hot shit and decided I knew better than the instructable and tried to change things up. Boy was I wrong.

Everything worked out ok in the end, but there were a few issues. So here's some tips and some things not to do when making a piñata.

First off here's the base of the piñata:


It's a lot more tape and paper than the last one. That caused some issues later in the process so I'd suggest always trying for more balloons and less tape. Because of the final shape of the piñata I'm not sure how I would have made that work, but just keep that in mind.

I live in Hawaii where it can be pretty humid and I've now learned that I definitely need help from a fan when drying papier-mâché. When I opened up the piñata it was still slightly wet inside even though it was dry on the outside.

One other problem that I didn't figure out until my last layer was that my starch had settled so most of my layers were more watery than starchy. Which explains why it wasn't hardening like it should have. So, make sure you shake the liquid starch well before using it.

Another small issue was that the string I had was too thin. It definitely didn't seem like it would last too long so I told them not to hang it up for long.

This biggest issue that I had was totally my fault. I jumped the gun on opening it up and stuffing it. I was thinking by opening it before the final couple layers I'd be able to secure the closer so much better. What I didn't think through was that then it would be soaking wet and heavy while drying the last layers.

Because of the added weight it toppled and landed in such a way that the ass cheeks became indented. I woke up to this the morning of the party and had a slight meltdown. I had to cut it open and pop out the cheeks. Then cover up the creases and reseal up the opening.

All in all it turned out ok. It looked great but it was easier than it should have been to open up.

So lesson learned...follow the damn instructions.